
No matter how I tried, this photo was throwing a tantrum and wouldn't show the details from the original photo. I hope you make it to Quilt Con or Quilt Market because this gal will be at the Aurifil booth and you can meet all her thready details in real life! Woohoo!
I’m so excited to finally share my latest pillow project with you! This 20" x 20" quilted zipper pillow is my most recent submission for the Aurifil Artisan challenge, featuring threads from the new Aurifil 8 wt Indelible Collection by Anna Maria Textiles. The collection, with 20 stunning colors, is releasing in October 2024, and trust me-you’re going to love them as much as I do!

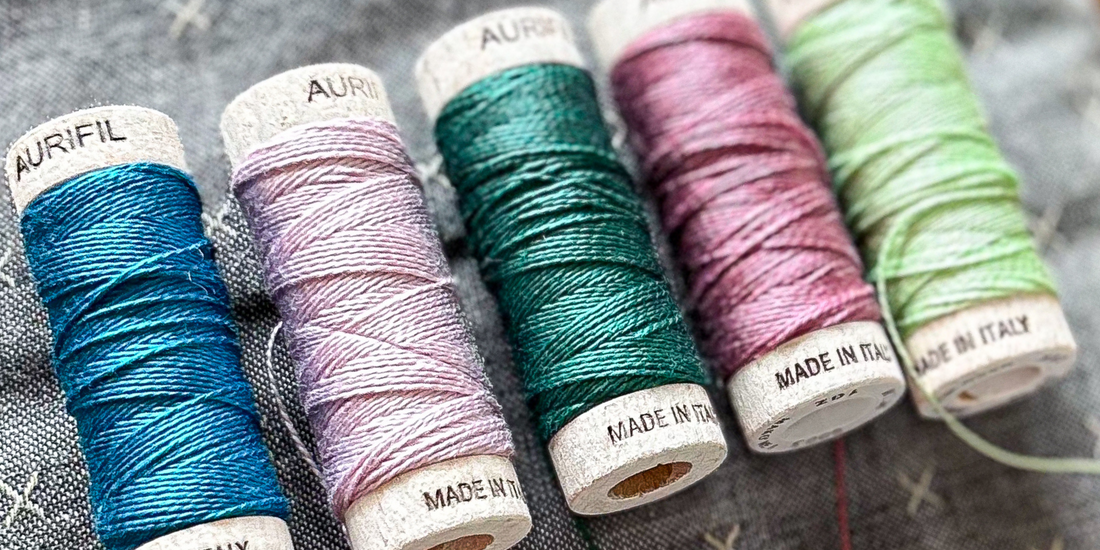
For this pillow, I used five gorgeous 8wt colors from the collection to hand stitch (front and tassels) and use as top thread for machine-quilting (back):
- 2880: Pale Green
- 5003: Wine
- 4129: Turf Green
- 2510: Light Lilac
- 1125: Medium Teal
Tip: You'll want a 50 wt for your bobbin. I switched between 2021 (Natural White) and 5004 (Grey Smoke).

Bringing Texture and Color to Life
I paired these beautiful colors with Fableism Sprout Woven in Pepper for the background. The subtle texture of this woven fabric lets the thread colors pop in the softest, most organic way. The front of the pillow features a 12 ½” circle stitched entirely by hand using a vertical running stitch, which ripples out from the center like a stone dropped into a calm pond. Each row is spaced 1/4" apart, and I alternated the thread colors to give a dreamy, rainbow gradient effect. In case you're wondering, my go-to needle for thicker thread is a Chenille Size 24.

I worked in stages:
Step One: Stitching the Center Circle
Creating that soft ripple effect with running stitches

Step Two: Adding the Outer Circles
Gradually building texture and interest

Step Three: Finishing With the Corners
Hand-stitched touches in the corners, tying everything together with a balanced design

Step Four: Making Tassels
These sweet little thread tassels were so easy and added the perfect finishing touch! Each corner has its own tassel in a different color, giving a whimsical feel to the finished pillow.
Here's how I made the tassels:
- Leave a long tail on the end.
- Wrap your thread around a 2 1/2" piece of cardboard or ruler until you like the thickness.
- Remove the thread from whatever you used for wrapping.
- Use the long tail to wrap around the top of the thread loop a few times and then knot it, leaving a long tail at the top.
- About a finger's width from the top use the thread still attached to the spool to wrap around the tassel several times and then make a double knot.
- Make sure you have a long tail and cut the thread from the spool.
- Thread the end you just cut into a sewing needle.
- Push the needle up through the middle of the tassel and through the center of top of the tassel.
- Cut the bottom loop of the tassel to make a fringey end.

Step Five: Attaching the Tassels
The best part? I attached the tassels with a bow on the inside so they're removable for washing!
- The original tail and spool tail should now be together at the top of the tassel.
- Thread a needle with both tails.
- Insert the needle through the corner of the pillow, pulling the tails into the pillow case.
- Tie off with a bow on the inside of the pillow case.

Step 6: Adding a Few Extra Details
I thought it would be fun to go back through and add the extra little stitches that look like a plus or an x.

Machine Quilting the Back of the Pillow
For the back of the pillow, I switched gears and used my trusty Juki TL2020 PE to machine quilt a 60-degree diamond grid. I continue the theme of alternating thread colors, which kept things playful and interesting. Oh, and let’s talk zippers—I used a mint green nylon zipper (super cute!) in the bottom seam.
If you’re not sure how to tackle a quilted zipper pillow, don’t worry—I’ve got a step-by-step guide HERE to walk you through the whole process of making the pillow cover and sewing the zipper.
How to Make a Quilted Zipper Pillow | Tutorial


My Top Tips for Quilting with Big Threads
If you’ve ever tried machine quilting with an 8 wt thread, you know it comes with its own challenges, but here are my best tips for success:
- Increased Stitch Length: I bumped my stitch length up to 3.5—you don’t want tiny stitches when working with thicker thread.
- Check Your Tension: I had to increase my top thread tension a bit for the best stitch quality.
- Use a Walking Foot: It helps everything feed through the machine evenly.
- Hold Both Threads at the Start: Make sure you hold both your top and bobbin threads when you start stitching so they don’t tangle.
- Slow and Steady: It’s tempting to go fast, but with big threads, you get more control and less thread breaks if you slow down.
- Jeans Needle: I used a Schmetz jeans/denim needle, which is strong enough to handle the 8 wt thread without skipping stitches. The eye is enlarged and you'll notice a divot in the needle near the eye for the thread to glide through.
- 50 wt Thread in the Bobbin: I kept Aurifil 50 wt in the bobbin, so I didn’t add any extra bulk. Don’t try to put 8 wt in your bobbin—it’s not worth the headache!

Wrapping it Up
I'm so proud of how this project turned out! The rich textures and playful colors from the new Aurifil 8 wt Indelible Collection really brought this pillow to life. Whether you’re creating a quilt, pillow, or something else, I know you'll fall in love with threads just as much as I did.

Mark your calendars for October 2024 when these beauties officially launch, and in the meantime, I hope you’ll give this pillow project a try.