How to Make Half Rectangle Triangles (HRTs) – A Simple Guide
Half Rectangle Triangles (HRTs) are a versatile and dynamic quilt block shape that can add striking movement to any design—but they can feel a bit tricky at first. If you’ve ever been puzzled by trimming, lean directions, or how to get your points just right, this guide is for you.
In this post, I’ll walk you through the method I use for trimming precise HRTs, how to understand left- vs. right-leaning blocks, and why marking your ruler is the key to success.
Prefer to watch it in action?
🎥 Watch the step-by-step video tutorial below!
Supplies Used in this Video:
- Two fabric rectangles of the same size
- Rotary cutter
- Cutting mat
- Quilting ruler
- Pins
- Sharpie - to mark on ruler
- Alcohol swab - to clean markings from ruler
- Sewing machine
🧵 What Are Half Rectangle Triangles?
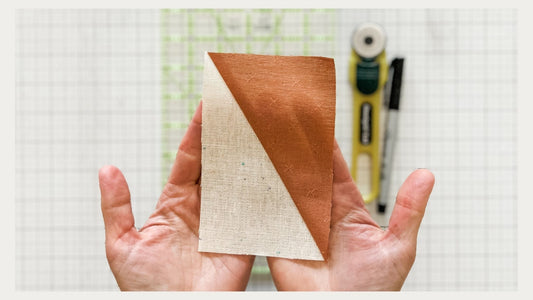
Unlike Half Square Triangles (HSTs), which start as squares, HRTs begin with rectangles. Their final shape is a right triangle stretched across a rectangle—either leaning left or right. This means:
-
Left-leaning HRT: diagonal seam runs from the top left to bottom right
-
Right-leaning HRT: diagonal seam runs from the top right to bottom left
Because of this directionality, HRTs are not interchangeable like HSTs. It’s important to cut and sew them intentionally depending on your layout.
📐 The Trimming Ratio Rule
Before we dive into trimming, there’s one rule to keep in mind:
📌 Tip: The starting rectangle must have the same aspect ratio (height to width) as your trimmed HRT block.
For example, if you want a 2" x 4" finished HRT, your starting rectangles might be cut at 3 ½" x 6 ½" to give you trimming room—but that 1:2 ratio must stay the same. Otherwise, the angle will be off.
✂️ Trimming HRTs: My Simplified Method
Trimming can feel intimidating, but I promise it doesn’t have to be. The key is to mark your ruler with a few key reference points using washi tape or a fine-tipped sharpie:

🟣 Step 1: Mark the ¼" Seam Allowance Points
Start by placing a small dot:
-
¼" in from the top right corner
-
¼" up and to the right of the height and width intersection point (see Step 3)
These dots represent where the seam allowance will land—your goal is to keep them on the diagonal seam when trimming.
🟣 Step 2: Mark the Final Block Size
-
Mark the cutting height along the top of your ruler.
-
Mark the cutting width along the right edge.
🟣 Step 3: Add a Center Guide
Towards the center of your ruler, find where the two measurements would intersect from Step 2 if you drew them inward. Mark ¼" up and right from that intersection, and place a second dot. This helps keep your seam centered as you trim.
📌 Tip: As long as you align those two marked dots with your diagonal seam when trimming, your block will trim accurately every time.
🔄 Left vs. Right Leaning
You’ll follow the same trimming method for both directions—but you’ll flip the unit depending on which lean you need.
-
Want a left-leaning HRT? Keep it oriented just like in the video.
-
Need a right-leaning HRT? Your original rectangles will be cut from the lower left to the upper right corner.
Why Are My Beginning Rectangles So Much Bigger Than My Trimmed Block?
This is intentional! HRTs require a generous starting size to give you:
-
To allow for the same height to width aspect ratio as the trimmed block while maintaining usable cutting measurements
-
Enough wiggle room to trim to perfection
-
Accurate points without stretching or distortion
Always use rectangles that are larger than your final trimmed block, but keep the same ratio.
🧷 Summary
Here’s a quick recap of what to remember:
✅ Keep your original rectangles in the same ratio as your finished HRT
✅ Mark the ¼" seam dots on your ruler
✅ Mark your final cut size on the ruler edges
✅ Always align the seam with your dots while trimming
✅ Flip for left- or right-leaning HRTs
If you try this method, I’d love to see what you make—tag me on Instagram @remivailstudioso I can cheer you on!
Happy quilting,
xo, Tamara
I have some resources and links to my patterns below! By subscribing to my weekly newsletter, I'll keep you in the loop with updates, tips, and more tutorials! Tutorials like this are so fun to share. I hope you've learned something new or taken a little tid bit that you can add to your own sewing practice.

Hi I'm Tamara, the heart and hands behind the scenes at Remi Vail Studio. When I'm not sewing you'll find me loving on my two fur babies, Tellee and Corduroy, playing outside with my hubby, or elbow deep in the dirt of my dye garden!
Resource Links
Quilt & Bag Patterns
My Favorite Threads
- Aurifil 12 weight Thread - quilting, embroidery, big stitch binding
- Aurifil 12 weight Wool Thread - embroidery
- Aurifil 8 weight Thread - embroidery, big stitch binding
- Aurifil 50 weight Thread - piecing, bobbin
- Aurifil 80 weight Thread - hand sewing
Essential Quilting Tools
Here's a Link to my Amazon Store Front if you're curious about the specific supplies I use!


