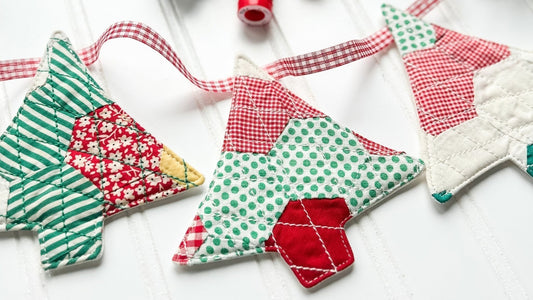
If you’ve been saving fabric scraps or small quilted pieces and are looking for a creative way to use them, this Quilted Holiday Tree Garland is such a fun, beginner-friendly project. It’s a scrap-friendly holiday or Christmas sewing project that turns bits of fabric and batting into something truly special for your home. Whether you use leftover quilt blocks, a vintage quilt top (like I did), or your favorite seasonal fabrics, this quilted garland brings a cozy, handmade touch to any space, perfect for your mantel, windows, or tree.

Before Getting Started
You’ll want to download the FREE PDF Tree Template HERE!
Please read through all instructions below before beginning. This tutorial assumes basics quilting and sewing knowledge.
Materials Needed For The Quilted Holiday Tree Garland
All of my favorite supplies are listed here!

Fabric (Front & Back of Trees)
· Two pieces of fabric about the size of a fat quarter (18" x 21") or several smaller scraps. One piece will be use for the front of the trees and one for the back.
Tip: Great fabric options include two fat quarters, an old quilt, scraps, pieced fabric, or unused quilt blocks. I used a vintage quilt top that was falling apart for the fronts and scrap linen for the backs.
Batting
- Two pieces slightly larger than your fabric pieces
Tip: Leftover batting scraps from other quilting projects work great!
Thread
- 40 or 50 weight for piecing, construction, and quilting.
- Consider a thicker thread, such as Aurifil 12 weight for if you like more texture. You could also consider some hand stitching or embroidery embellishment!
Tip: I used Aurifil 12 weight for machine quilting the fabric for the front of my trees and 50 weight for construction.
Ribbon or Twine
- About 8 - 9 feet, depending on how many trees you plan to make. I made 11 trees and used ~8 feet.
Tools
- Iron and pressing surface
- Temporary basting adhesive
- Fabric marking pen
- Quilting ruler, rotary cutter, and self-healing mat
- Sharp fabric scissors and paper scissors
- Sewing machine
- Pins
- Fabric clips
- Point turner or chopstick
- Tree template (paper) – Download HERE


Step 2: Quilt Your Fabric
- Mark the right side of the front fabric with your desired quilting design using a temporary fabric pen. I used a simple 60-degree diamond pattern with ¾" spacing between the quilting lines.
Tip: I find it easiest to mark the lines going one direction, then quilt, then mark the lines going the other direction, then finish quilting.


- Quilt the front fabric. I used Aurifil 12 weight thread for extra texture. You can also use standard 40 or 50 weight thread if you prefer.
- Quilting the backing is optional. I skipped it for mine.


Step 3: Trace and Cut Out Trees
- Download, print, and cut out one tree template. Get the free tree template here.
- Pin the template to the right side of your quilted front fabric and trace it using a fabric marking pen.
- Continue to trace enough trees onto your quilted fabric until you have the total desired number. I traced 11 total. 12 can be made from one fat quarter using the diagram included with the tree template.


- Cut out your trees.
Tip: I like to use a rotary cutter and sharp pair of small scissors to cut out the trees. The scissors really help around the smaller curved corners and where the trunk meets the tree.


Step 4: Sew the Trees
- Layer each quilted tree front and backing fabric right sides together. Please note, the batting should already be attached to the wrong side of the fabric backing. Pin all layers to hold in place.

- Mark (using a fabric pen) a 2 - 3 inch opening on the batting side of your tree along one side. This opening will be used later for turning the tree right side out.


- Starting at the lower marking, backstitch, then sew around the tree using a ¼" seam allowance and a short stitch length (1.5–1.8 mm).
- Stop sewing at the top mark and backstitch, leaving a 2 – 3 inch opening which will be used for turning the tree right side out in a later step.
- Sew the rest of your trees using the same method.


Step 5: Trim the Trees
- Following the shape of the front part of your trees, trim the excess backing fabric using your rotary cutter and small, sharp scissors.
- Trim the excess fabric from the small, rounded corners. Cut diagonally, being careful not to snip the stitches. This will reduce bulk in these areas, allowing for easier turning.
- In the sharp corners between the trunk and tree, use your scissors make a small diagonal snip into the seam allowance, without cutting the stitches, to allow for easier turning.


Step 6: Turn the Trees Right Side Out and Topstitch
- Turn each tree right side out through the opening.
- Use a point turner (or a chopstick) to gently push out corners.
- Press flat.


- Tuck the opening seam under ¼" and press again.


- Topstitch around the edge using a scant ⅛" seam allowance and a 2.5 mm stitch length. Backstitch at the beginning and end.
Tip: Hold the tails of your thread when starting the topstitch so you don’t get a little bird’s nest of thread on the back. When turning the corners, keep your needle in the down position, lift your presser foot, turn your fabric, lower your presser foot, then continue sewing.
6. Trim and topstitch the rest of your trees using the same method.


Step 7: Attach Trees to the Ribbon
- Lay out your trees as you want them to be hung and make sure you like the order.
- You will need about 8 feet of ribbon if you made 11 trees or 9 feet if you made 12. Wait to cut your ribbon until you’re sure of the tree spacing.

- Tie a loop at one end for hanging.
- Measure about 6" from the loop.

- Position your first tree so the top is about ½" from the top edge of the ribbon. Use a fabric clip to secure the tree in place.


- Measure 5 ½" from the first tree top and place the next tree top on the ribbon so the top is ½” from the top of the ribbon, and secure with clips as before. Continue securing trees along the ribbon, keeping spacing even.

- Once all trees are placed, double-check spacing and adjust as needed before sewing.
Tip: If you know where your garland will be hung, try hanging it to see if you like the spacing and length.


Step 8: Stitch Trees to Ribbon
- Stitch along the previous topstitching lines on both sides of the tree tops where they cross the ribbons to secure. Backstitch at the beginning and end.


- Repeat this process for each of the trees.

- After the last tree, measure another 6" tie a final loop, and trim the ribbon.
Step 9: Hang & Enjoy
Your Quilted Holiday Tree Garland is ready to hang! String it across a mantel, along a window, down a banister, outside in a protected sport, or on holiday tree for a handmade, heirloom-style touch.

You could also consider making individual tree ornaments!

Download the Tree Template
You can download the free printable tree template here. Print it at 100% for the size shown, or scale it up or down to make your trees larger or smaller.


Enjoy!
I hope you love making this quilted tree garland as much as I did. Projects like this are such a wonderful way to use scraps, preserve pieces of old quilts, or simply add a handmade touch to your holiday decorating.
If you enjoy quilting projects that blend story, texture, and tradition, you’ll find more patterns, fabric, notions and tutorials waiting for you at RemiVailStudio.com.
I’d adore seeing your Quilted Holiday Tree Garland! Share your photos on social media using the hashtags #QuiltedTreeGarland | #RemiVailStudio | #RemiVailStudioPatterns and don’t forget to tag me @RemiVailStudio so I can celebrate you!
Happy sewing and merry making!
🧵 xo, Tamara
















1 comment
Thank you for this lovely idea. I don’t have a quilt to use, but have many scraps. I’m going to share your site with my quilting friends at a show and tell on Saturday!