
For the August 2025 Aurifil Artisan Challenge, I was asked to “celebrate summer vibes and fond memories by reimagining the postcard.” The idea was to create a mini quilted design, embroidered message, or stitched scene inspired by a hometown, a travel memory, or something special.
As I thought about this challenge, my mind and heart went straight to Minnesota summers. There’s nothing quite like the haunting call of a loon across a still lake. It’s wild and familiar all at once, a sound that always gives me pause and feels stitched into the rhythm of summer here.
Step 1: Create an Illustration ✏️
Every project starts with an idea. For me, that meant sketching in Adobe Illustrator to draw my loon scene, but you don’t need special software. A quick pencil sketch on paper works just as well. You might even use a free image as inspiration (as long as it’s not copyright protected). Having a picture to guide you is incredibly helpful.
Step 2: Gather Supplies and Fabric
With my sketch in hand, I pulled together what I needed:
- Front background fabric, ~5 x 7 inches
- Backing fabric, ~5 x 7 inches
- Fabrics scraps in the colors from your image or illustration
- Pellon fusible fleece (987F) ~6 x 8 inches
- Batting ~6 x 8 inches ( I used wool, but you can use a scrap of whatever you have.)
- Glue pen - My favorite is the Sewline Water Soluble Glue Pen
- Chenille Needle for embroidery - My favorite are the Size 24 by DMC
- Aurifil threads in various weights. I used a mix of 12 weight, 8 weight, Floss, 50 weight, and clear monofilament.
- Needle Threader - My favorite are these threaders from Dritz.
- Scissors - small and sharp - My favorite are the Kai 5 1/2" Embroider Scissors
- Optional: Temporary basting glue by Roxanne
- Optional: Wonder Clips
- All your regular sewing notions: sewing machine, rotary cutter, quilting rulers, sewing machine needles

Step 3: Prepare the Front Background
I fused my front background fabric to a piece of Pellon fusible fleece. This created a stable base to work from when layering the fabrics and stitching.
Step 4: Cut and Layer Fabrics
Using my illustration as a reference, I cut scraps to match the shapes in my illustration and layered them onto the background. I like to use really small, sharp scissors to cut out tiny fabric pieces. My favorite pair that I use for everything are the Kai 5 1/2" Embroidery Scissors. This part feels like collage with fabric. To hold everything in place, I used the Sewline Water Soluble Glue Pen and set it with a light press of heat.
Step 5: Hand Stitch the Pieces
Once everything was arranged, I secured the shapes with hand stitching. I used a DMC size 24 chenille needle and a mix of Aurifil threads in different weights. The variety of threads gave me a range of textures, almost like sketching with thread.
✨ Tip: Because these threads are little thicker, it can be helpful to use a needle threader. Here's my favorite!
One surprise I loved was how the raw edges began to fray just slightly. It added an unexpected layer of texture. If you prefer a cleaner look, you could back your scraps with a light fusible interfacing like Pellon SF101 before stitching.

Step 6: Add Dimension with Free Motion Quilting
After the hand stitching, I slipped a layer of wool batting behind and quilted around the edges of each fabric with Aurifil’s clear monofilament thread in my sewing machine. The result was just the right amount of puff and depth, making everything come alive while securing the edges in place.
✨ Tip: I only use clear monofilament as a top thread and keep 50 wt cotton in the bobbin. You may also want to reduce your top tension slightly.

Step 7: Create the Postcard Backing
For the back, I cut a 5 x 7 inch piece of fabric and fused it to Pellon fusible fleece. If you want a stiffer postcard, you could experiment with a heavier stabilizer.
To sew the front and back together, trim both pieces with a ¼ inch seam allowance, they will be 4 1/2" x 6 1/2". Place them right sides together and stitch around all edges, leaving a 3 inch opening at the bottom. Before turning, clip the corners on a diagonal (without cutting into the stitches). This makes the corners turn out more cleanly.
Step 8: Finish the Postcard
I turned the postcard right side out, pressed it flat, and tucked in the seam allowance at the opening. A few dots of Roxanne Temporary Basting Glue and Wonder Clips kept everything secure while I hand stitched the opening closed with a double strand of clear monofilament thread.
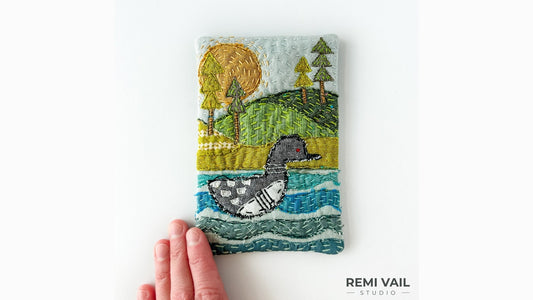
And just like that, my loon postcard was finished: a little piece of Minnesota and my heart stitched into fabric and thread.

Optional Embroidered or Written Message
This project would be so sweet with a short embroidered note or even just your name and date stitched onto the backing. I still might add a little message to mine. If you didn't want to embroider a note you could use a permanent fabric pen to write a note or your name instead. This is my favorite permanent fabric pen.
I think I might try framing or hanging this in a special place. It would also be such a lovely gift.
Final Thoughts 💌
This little postcard reminded me how much story can be carried in something so small. A handful of scraps and a few stitches were enough to capture a memory I never want to forget. For me, this one will always hold the feeling of Minnesota summers and the echo of the loon’s call across the water.
If you try making your own fabric postcard, I'd love to see it! Tag me on Instagram @RemiVailStudio on Instagram and Facebook. I would love to cheer you on!
Happy quilting!
xo, Tamara

I have some resources and links to my patterns below! By subscribing to my weekly newsletter, I'll keep you in the loop with updates, tips, and more tutorials! Tutorials like this are so fun to share. I hope you've learned something new or taken a little tid bit that you can add to your own sewing practice.

Hi I'm Tamara, the heart and hands behind the scenes at Remi Vail Studio. When I'm not sewing you'll find me loving on my two fur babies, Tellee and Corduroy, playing outside with my hubby, or elbow deep in the dirt of my dye garden!






1 comment
Thank you